Tuesday, March 19, 2013

Fun Easter / Spring Nails

Today just a quick tutorial for a great spring or Easter nail. I like this take on an Easter Egg without being too literal about it.

I got this idea from a Pinterest pin, so I cannot claim the creativity on this one. However, I loved it so much I had to try and recreate it.

Start by taking an all over color. Choose something light so that the overlay will show up. I chose Harmony Gelish Seafoam.

After you paint your 1 or 2 coats of an allover color, paint a diagonal line with your thin nail brush with a black.

Fill in the tip of the nail from the diagonal line up with black polish.

Using a dotting tool, make medium sized dots over the black polish.

Use a thin nail brush to create a glitter accent diagonally where the light color meets the black.
Lastly, finish with a top coat!

I will post pictures when I do it next :-( sadly I didn't have my camera while I was doing this.
Enjoy!
This was done with gel nail polish. The base color is
Gelish Harmony Seafoam

Friday, March 15, 2013

St Patty's Day Clover Manicure


Ayyy mi lads and lassies! It's that time of yer again....

Green beer, corned beef and cabbage, awful Irish accents, and lots of green! Whatever you do to celebrate  be safe and have fun!

In the spirit of St. Patrick's Day, I've added a special Clover Manicure just for you. Yes you! If you've seen or attempted my hearts manicures in the past, you will find this super easy as its just a few hearts connected.

Start by painting your nails as normal. I painted my nails green and left my ring finger a glittery gold color. This is the finger I will add my clover accent.

Once you've got your nails painted, on a piece of foil, put a small dollop of green polish.


Put small amount of polish on foil
Using a dotting tool (i got mine on amazon), create three sets of two dots next to each other. This will be the start of your leaves for the clover. I am doing three leaf clover. If you want to make a four leaf clover just make sure you have enough room.

You will want to use a medium sized dotting tool. If it's too big, the dots will run together. If the dotting tool is too small, you will not get the right size you need for the leafs.


Small dots next to each other to start the leaves
Now, put a large dot in the middle of your smaller sets of two dots.

Add large dot in middle

Start to blend all the circles together using the smaller end of your dotting tool. You don't necessarily need to add any polish, just blend the dots to look like a clover.

Blend circles together

Lastly, add a stem at the bottom of the clover. I did this with the small end of the dotting tool. 

Last step: add stem

Here is the finished product. It's pretty easy try it a few times on the foil if you want to practice before you try it on your nails. Add more accents or add some dots around the clover for something a little different. If you have black polish and a thin nail brush, feel free to outline the clover with black polish!

Now go out there and drink lots of beer, eat lots of food, and show off your new manicure! 

Thursday, March 14, 2013

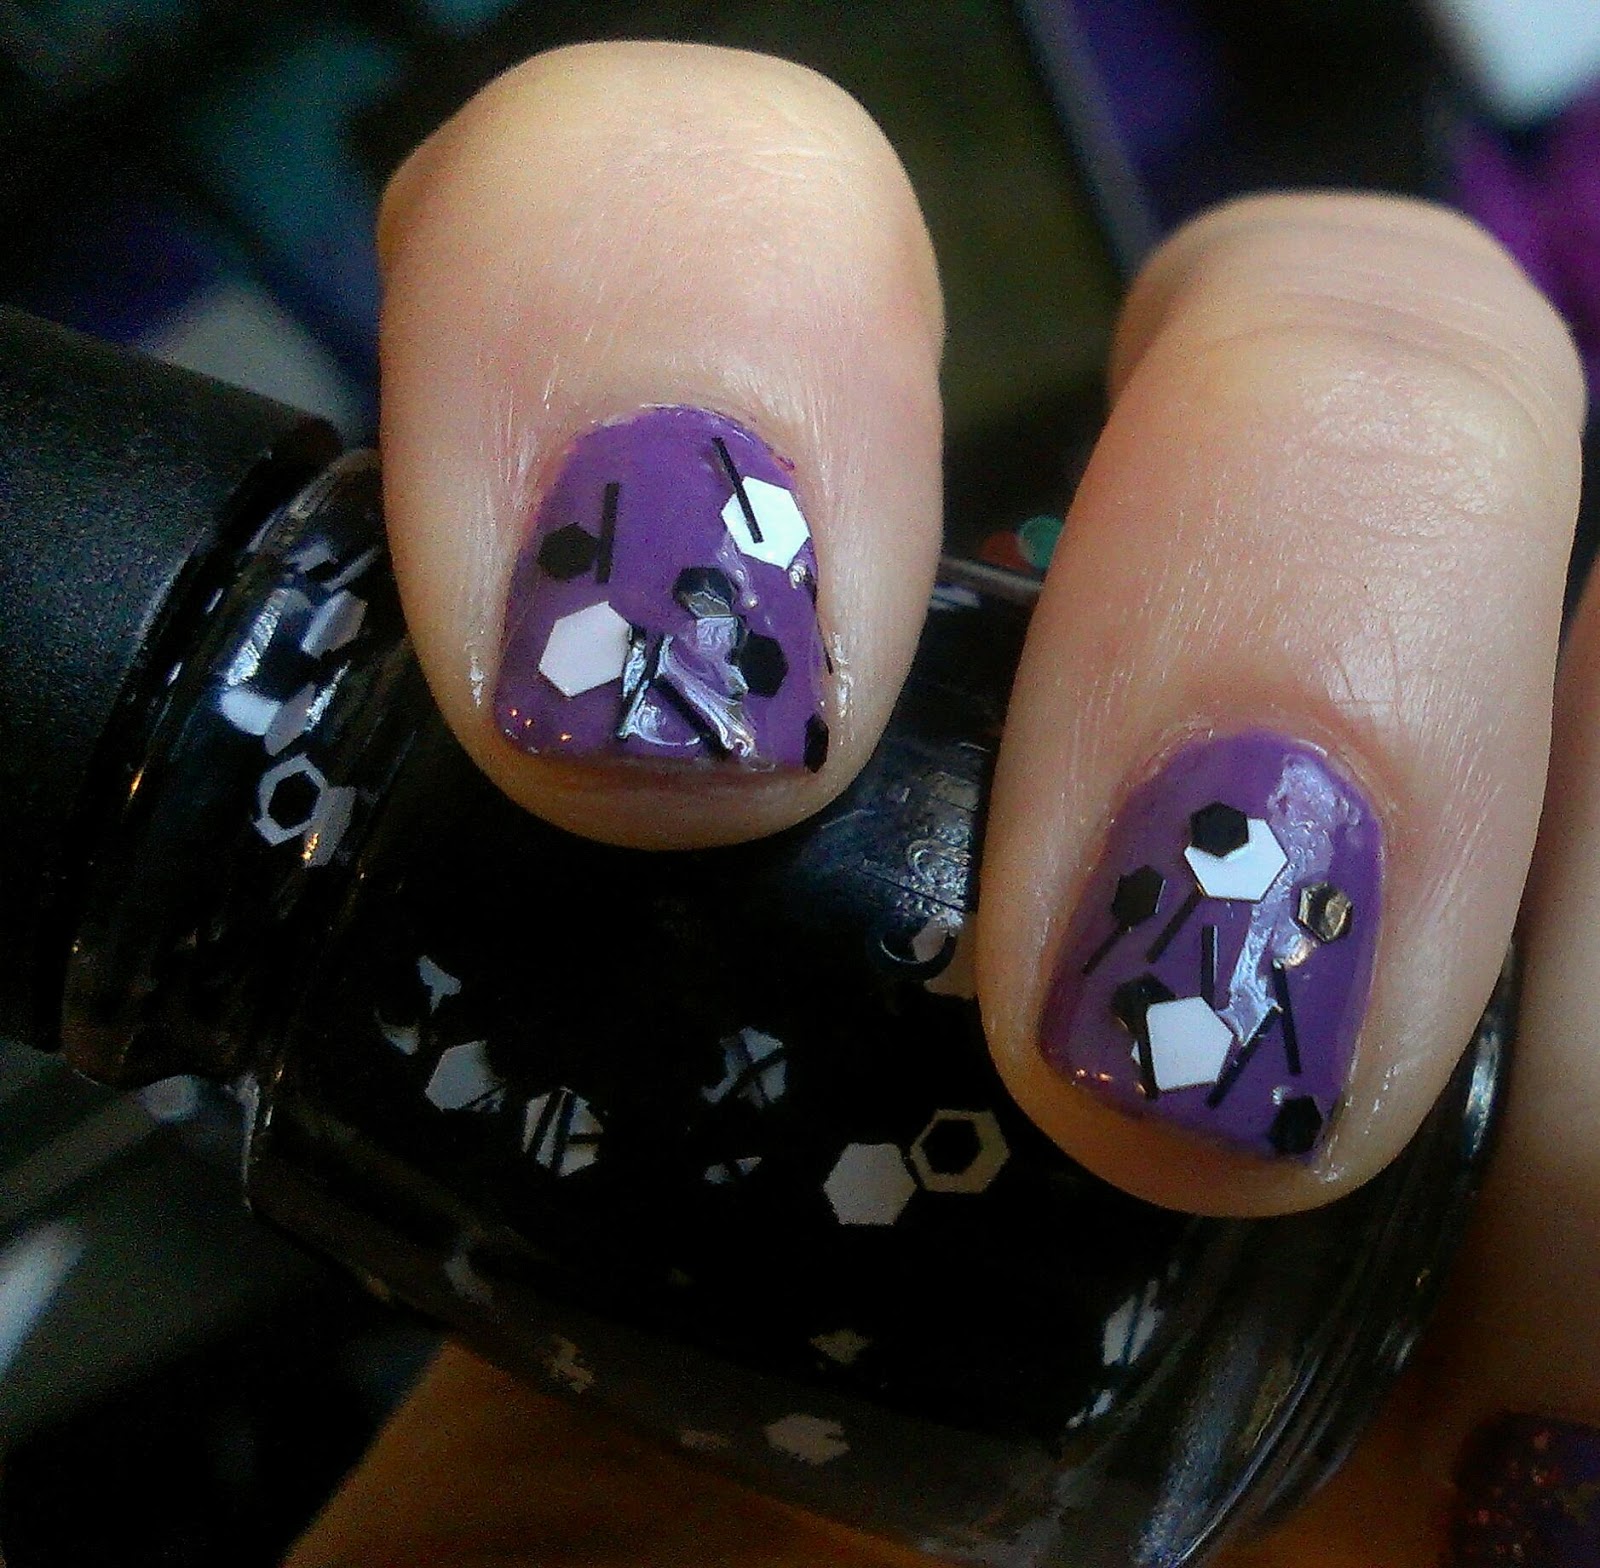
China Glaze Whirled Away Polish Review

I was aimless gawking at everything at my new store addiction (Sephora) and stopped in front of a China Glaze end cap.

There, looking at me with perfect nail polish daze was the China Glaze Whirled Away polish. I had to try it. Plus I had a coupon! Oh yeah! 

I was going to try this without an undercoat but decided to top it over China Glaze Spontaneous. This being one of my all time favorite purples.

I will tell you, this polish is hard to work with. The little pieces are kind of big and don't go onto the nail evenly. You want to make sure you shake the bottle well before you start to paint. Also, use a tooth pick or pin to adjust the pieces once you apply. They tend to stick over one another, so I used a pinhead and spread them out so it wouldn't look so thick. I recommend to do one nail at a time.

Overall it's a neat effect, I like it on top of another color. It took awhile to dry because it is so thick so if you have some time to kill and wait for your polish do dry and want a cool effect, try this. 

If you are impatient, stray away from this one.

China Glaze Whirled Away on top of
China Glaze Spontaneous 

Wednesday, March 13, 2013

Wrapping paper funzies - DIY Magazine Wrap

I am sure we have all been in that situation where we need to wrap something but you have nothing to wrap it with. I have had this happen many times.

I used to wrap things in tissue paper. This is a great solution and super cute way to add your own personality on gifts. You can add stamps and stickers etc. This only works if you have tissue paper on hand :-/

I went to wrap a gift for my sister for her birthday and checked for wrapping paper. Of coarse I didn't have any, then I went for my secondary choice; tissue paper. I had run out of that too. With only 10 minutes until I had leave the house and not enough time to hit a store for a gift bag, I improvised.

Take a magazine and start by ripping a few pages out.

Next tape the pages together, but hide the ripped edge.

Wrap the gift and add a ribbon and wa-la!


This is a fun way to wrap without having to spend a bunch of money on paper. You can customize the pictures you rip out to the person you are giving the gift to. This adds a personal touch to your wrapping and my sister loved it!

Finished product!

Wednesday, February 27, 2013

Quick Heart Tutorial

Today will be a quick post on how to create hearts. You can do this with regular nail polish or gel nail polish. In the photos below I was using regular polish.

I used a dotting tool. I got a package of them on amazon for very cheap but they shipped from over seas so they took some time to get to me. You can use a tack, safety pin, or a toothpick as well.

**Update** One of my readers (thanks Mom!) pointed out that using the foil helps while doing this. Don't try dipping the dotting tool directly into the bottle of polish. It is hard to see how much you are getting on the tool. Use a piece of foil or plastic wrap. This also helps when using a thin brush tool as well!

                                                                 Happy Hearting!

Monday, February 25, 2013

Ripped Jean Tutorial #2


I had posted recently a ripped jean lace tutorial. When I was doing the fix and adding the lace I completely spaced taking pictures.

This is another jean tutorial to add accents and cover those holes. This time I actually remembered to take pictures. Hopefully this will be a little more helpful than the last one!

This tutorial is really good for those jeans that you bought that were already cut with holes or distressing. After a few washes or from wearing, the hole gets too big and you want to cover it up.

First things first; grab your jeans that you want to fix.


Now, cut a piece of fabric, lace, or whatever you want to use. Just make sure whatever you choose has the same washing capabilities as your jeans. I chose a fun green because the hole I am covering is small, so this will give a fun pop of color. Cut the fabric just a little bit bigger than the size of the hole, and it's easiest to cut a square shape.


 Now turn your jean inside out. For those novice sewers, you almost always sew on the inside of the clothing. 


Next, pin your fabric to cover the hole on the inside of the jean. 


Start sewing the first corner of your square fabric color. Make sure to use a thread that matches the color of your jeans. Unless you want to see the thread and use a fun color. For this tutorial I used a blue to match my jean. You can do this using a sewing machine or by hand sewing. I chose to use my sewing machine because it's faster.


Turn the fabric to sew each corner. Sew all the way around the fabric and try to keep a straight line as possible  It can be a little tough to moosh all the fabric around the sewing machine, just take your time. 


Lastly, cut all the loose threads and turn your jean right side in. 

Tuesday, February 19, 2013

Matte About You Nail Polish Review

I have been addicted to the matte nail polish! It's so cute and fun, and since my recent encounter with the matte-like liquid sand nail polish; I have been obsessed with the Matte Polishes.

Unfortunately I am cheap, and do not want to buy all new polishes just to get the Matte effect, SO... I tried the Matte About You Top Coat from Essie. I have to say that I have tried Matte Top Coats before, the last one I got was from Sephora (I don't remember the brand) but it did not look right and I was highly disappointed. Needless to say, I was skeptical to try the Essie top coat. I should save my skepticism for bad movies and dark alley ways because this top coat did exactly what it said it was supposed to do!


First, I applied a base coat.

Then two coats of China Glaze 'Spontaneous'. Make sure to let each coat dry really well so it's not too thick.

Next, I applied one top coat of the Essie Matte About You. Be careful not to put too thick of a coat. It kind of dries fast so you want to make sure you cover the whole nail. One coat was more than enough for me. It dried pretty quickly to the touch.


My recommendation? APPROVED! I am excited to try using the top coat on half and keeping it glossy on the other half.

Best way to save your old polish and get that Matte look without having to spend a ton of money! Go get yoself some of this. I got mine on amazon for about $7!


Before Matte Top Coat
After Essie Matte About you Top Coat

Sunday, February 10, 2013

Liquid Sand Nail Polish Review

I happened to be at Ulta today (BTW it was my first time in there, and OMG! I love this place! How have I not been here before?) Anyway, I saw the O.P.I. Liquid Sand Nail Polish. They had a little fake fingernail display and it looked neat. So I decided to purchase the mini sampler pack because I couldn't decide which color I wanted. Also, Mariah Carey was on the box looking all hott and I thought maybe if I get this nail polish I can look hott like Mariah (fat chance!).

Mini bottles of O.P.I Liquid Sand
I decided that since it's so close to Valentines day that I would try "The Impossible" which is the pink/reddish color.

The directions say to use a base coat and then apply two coats of the color. Do not use a top coat. Sweet! Even better - I don't have to wait for a top coat to dry. SOLD!

O.P.I. Liquids Sand in "The Impossible"
I was so impressed! The color didn't take long to try and it looked as cool as it looked on the fake fingernail thingy in the store. That rarely happens!

The color is really pretty, it's a pink with some red undertones. There is a lot of glitter in it, but it's not super sparkly. The coolest thing about the liquid sand polish is that it really looks like sand. It's matte, not shiny like other glitters. It has a cool texture and looks awesome in natural light. I am hoping the color lasts longer than regular polish.

My recommendation is to try it. Get the mini pack - it seems like a little bit of this polish will go a long way. Also the large bottles were $8 a piece at Ulta and the mini pack was only $12. I am cheap.. and I wanted to try multiple colors. Mini pack it is!

I can't wait to try some fun designs with the sand texture using regular polish and this polish! I will have to do another post when I have time to play.

Until next time.. ta ta my nail art addicts :)


Am I all sexy like Mariah Carey now?
Oh yeah, still rocking the sling from
my surgery.. that's hot!


OK fine, here's another more serious pic of what the polish looks like

Friday, February 8, 2013

Heart Mani/Pedi


Cute little hears and dots. Awe, now that's better than a
Valentines Day card!

I am not a huge fan of the big Hallmark Holiday we all know as Valentines Day. However, I do love an excuse to have cute pink fingers and toes!

This called for a heart mani/pedi.

Please excuse the condition of my toes (in the pic below), I got surgery done on my arm which resulted in me being in a sling, and I have not had the mobility to properly take care of my feetsies at the moment. I am ashamed!

I messed up the lower right of this heart, but you get the point.
Use a dotting tool to create two large dots, then blend them
down to a "V" to create the bottom of the heart.

Either way, the manicure is still really cute and easy.

The dots - easy, use a dotting tool.

The hearts, use a dotting tool (large one works better) dot two dots right next to each other. Next, put another dot below the two large dots. Then use a smaller dotting tool (or a toothpick) to blend them together in a heart shape.

Try dotting all the way around with accents, or using different colors. Be creative!

Below is my attempt at some photo instructions. I hope it makes sense, it really is easy so it's hard to show how to do it!


Step 1: Use large dotting tool and dot
two right next to each other
Step 2: Put a smaller dot just below the
two larger dots
Step 3: Using a smaller dotting tool
(or toothpick) blend the
dots to look like a heart.


Tuesday, January 29, 2013

Pink Zebra Nail


Make sure to let each coat dry before moving onto the
next step

Tried one on my own this time. It was actually pretty easy, just a little time consuming. I haven't tried this with the gel polish yet, this is with regular polish.

~ Start by painting a base coat
~ Paint nail with a bright pink
~ Using a light pink, paint a diagonal tip
~ Using black polish, paint zebra lines (use a really thin nail brush and paint little squiggles)
~ Paint a silver accent across the nail where the light pink and dark pink meet
~ Paint top coat

Use a thin nail brush for zebra stripes and silver stripes