Friday, August 30, 2013

Leopard Tri-Color Mani


This week I decided on a fun multi colored leopard print mani. I used a Pinterest picture as inspiration but the link was dead so I can't give the person credit. I also added my own spin on it to make it a little different.

The leopard spots are extremely easy to do and I love how they turn out. This is a fun mani for those who are just starting out!

What you will need:
- Top and Base coats
- Black polish
- Teal (or light blue) polish
- Light Pink polish
- Dotting tool (or bobby pin but dotting tool works best)
- Foil or something similar (I use the top of a vitamin bottle so I can reuse it)


Start by prepping your nails as you normally would do (cut, file, etc) Next, paint your pinky and index finger with the black polish. Paint your ring and middle finger with the teal polish. Paint your thumb with the pink polish.

Next, we are going to create the spots. Dab some of the pink polish onto your foil. Use the larger end of your dotting tool, dip the ball into the pink polish so that we can create large non-perfect dots onto the ring and middle fingers.


Repeat the same steps for your thumb but instead of using pink, use the teal color. What we are doing is creating an offset effect with the colors.


Now we are going to finish the spots by adding black accents to the nails. Using the smaller end of the dotting tool, create small "C" shapes around the circles. Add a few small random dots in between the pattern. Repeat the steps for the thumb nail and the teal colored nails (ring and middle finger).


Last step is to paint with a top coat and you are all done! Rock that awesome mani :) Try playing with different colors to see what you like best.


Thursday, August 22, 2013

Pink Glam Nail Mani


It's been awhile since I posted! I am so sorry! I have been very busy. But I think you will like this one and I hope this makes up for it.

I am going to post most of the steps for this one but not all of them because it's actually quite easy and like a lot of my other tutorials.

What you will need:
- Base and Top coats
- All over color ( I used IBD Funny Bone - a pink gel color)
- Sliver glitter (or lose glitter)
- Rhinestone gems (I used stars and a square one for my pinky)

Start by prepping your nails first (file, clip etc) then paint all of your nails with your base coat. Next paint all of your nails with your all over color.


Next, on your thumb, use a toothpick or orange stick to apply three star rhinestones in a row. Use clear top coat to get it to stick to your nail.


Then apply a single gem to your pinky. Paint your ring finger with silver glitter. On your pointer finger do an ombre effect and just paint the tip of the nail.

Make sure to put a nice thick top coat on the nails that have the gems. I start by putting a small dot of top coat right on top of the gem then use the brush to even it out. This allows to get a good thick coat so the gems do not fall off.

Be creative and have fun!


Wednesday, August 21, 2013

Cute Make-up/Hair Storage Solution

I got this idea from my mom and thought I would share it here. I moved into a new house about a year and a half ago. I love my new house but the one thing I gave up in the new place was master bathroom storage. In return we have an extra bedroom and a pool, so it was a good exchange. However I found myself looking for creative ways for a "getting ready" space.

I ended up going with a small dresser in my office/craft room. This didn't take up much space and I didn't even get a full size dresser. I got everything from Ikea including the dresser, the mirror, the carpet, and the inside storage containers.

I now have a space to get ready and more than enough storage. I can do my hair and makeup all in one space. I don't know why I didn't think of this sooner but I am so glad I copied my mom!


Friday, August 9, 2013

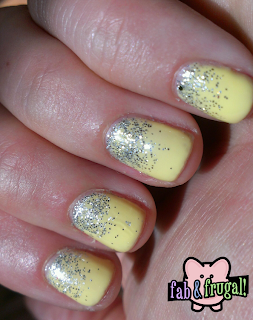
Yellow Glitter Ombre Mani


This is a quick easy one. I haven't posted in awhile I know I am a slacker. I have been so busy and that isn't going to change with the up coming weeks.

I have been focusing a lot lately on my weight loss journey. I made the decision it was time for me to start getting healthy instead of talking about it and wishing for it. It's been 4 weeks and I am down 10 pounds and still going strong! In case you are interested I have started a separate blog about my journey. You can find that here.

OK... back to why you are here. This awesome mani was done with gel polish but can be done with regular polish. Instead of posting step by step instructions on how to do this, I am going to point you to a different post that shows it because it's the exact same steps just different colors.

I like the yellow with the silver glitter a lot. It really pops. In case you are curious I used IBD Just Gel Polish, color was called Rocco. I started trying the IBD colors as compared to the Gelish Harmony brand, and I am glad I branched out. These colors are just as great, go on smoothly, and they are about $4 cheaper. And... you all know how much I like saving money! So pop on amazon and take a look!