Showing posts with label nails. Show all posts

Tuesday, March 31, 2015

Jamberry Review

So these cute little nail wraps have been popping up everywhere - these are called Jamberry Wraps

I have wanted to try them for sometime so I received a sample in the mail. (here's a link to a consultant where you can request a sample or view the wraps:

I applied the wrap per the directions (which were easy enough but you have to pay attention and use the tips and tricks). I used my blow dryer and it worked fine (since I didn't have the heater).

That mani (and I am sorry I dont have a pic of it) lasted for almost two weeks. The gel nails started peeling first and the accent nail wrap (on my ring finger) was perfectly in tact.

This is the second mani I did. It was easy to apply. Most of the wraps fit me without much trimming. This one lasted me about 6 days but this was the first one I did that was ALL wraps. One wrap started lifting about day 6 but instead of filing it down - i picked at it. The rest of them were left fully in tact.


This is the most recent mani I did. I applied it yesterday and I am going to do a before and after picture once a week or so goes by. 


I did this pedicure almost 4 weeks ago. I only have one wrap on my large toe and the rest regular polish. It's still perfectly in tact.


All in all, I would say these are pretty good.

Here are the Pro's and Cons:

Pros:
- So many styles
- Last for up to 2 weeks on hands and 6 weeks on toes
- Each sheet gives you 2 mani's and 2 pedi's
- Cost - only $15 per sheet

Cons:
- Some trimming of the wrap may be needed (but still easy to trim)
- You have to get the hang of applying them but it is fairly easy you just need to follow the instructions. 

You can check out the wraps here:
http://lindsayaz.jamberrynails.net/application
These are what the sheets look like. I'm excited to try the chrome ones.


What are your thoughts? Have you tried them?

Sunday, June 8, 2014

Cute and Easy Tiger Striped Mani

I have been a little lazy lately and haven't felt like doing the gel nails. I love that they last longer but on the same aspect they take a little more work getting off. So I have been exploring with the many bottles of regular polish I have.

I wanted to do something cute but easy and came up with this.

What you will need:
- Base and top coats
- White polish
- Pink polish
- Black polish
- Small piece of foil
- Thin nail art brush

Start by prepping your nails and painting with a base coat. Then follow by painting all your nails except thing ring finger pink. Then paint your ring finger white and repeat as many coats as you desire. Let completely dry.

Then place a small amount of pink and black polish onto your foil. Starting at the edges of your nail, create a small stripe. Practice on the foil first if you need to. Ensure you don't have too much polish on your brush. Repeat with the black polish.

Let dry then finish with a top coat. Enjoy! Oh and don't forget to follow me on Instagram - @fabnfrugalnails


Thursday, December 5, 2013

Neon Peek-a-Boo Nail Tutorial

Photo in natural light

Happy Holidays! It's been a fun past few weeks. I've been busy but I haven't forgotten about my nails. I did this nail design about a month ago but I love it so much I had to post it even though it's a bit summery. You can try this with so many different colors but I love the neon touch. I am heading to the Dominican Republic in about 6 weeks and I may have to recreate this!

What you will need:
- base and top coat
- 4 different colors
- nail striping tape


Prep your nails (clip, file, etc) then paint your base coat. A base coat is very important because it helps your nails look more even so the polish goes on smoothly. Also, they sometimes have vitamins so it will help hydrate your nails. Lastly, they help so the polish does not stain your nail.

Paint each of your index, middle, and pinky fingers a different color. I chose to use pink, yellow, and orange.


Now on your thumb and ring finger, paint stripes of each of the colors you painted on your other nails.


Using your striping tape, make a triangle design on your thumb and ring fingers

Now paint the exposed area with the last color (in my case, blue). I chose to make an opposite effect where I painted inside the triangle on my ring finger and outside of the triangle on my thumb.


Let polish completely dry before removing the tape. Once dry, apply the top coat. Try different designs and different color combos on this one. Enjoy!

Photo in artificial light

Wednesday, December 4, 2013

Striped Nail Tutorial


This is a fun easy one that you can do if you have nail striping tape or you can use regular tape. The great thing about this mani is that the possibilities are endless and there are so many color combinations.


Here is what you will need:
- Base coat and top coat
- Two nail colors (I used white and purple)
- Nail striping tape (or scotch tape)
- A glass of wine (ok not necessary but important nonetheless!)


Start by prepping your nails (clip, file, etc). Then paint your base coat and let dry. Then paint your nail with your all over color. You want to make sure you accent color can cover the all over cover well. I chose to use the purple on the bottom because I knew the white would cover the purple.


Now, place your nail striping tape (or regular tape) in your design manner. I chose to do different designs.


Now, paint your accent color on the side of the nail you want. If you are using the nail striping tape, be careful not to paint onto the other side of the nail. If you want and have a steady hand, feel free to leave the striping tape on the nail and just paint the top coat over the tape. Make sure to trim the excess edges.


Let dry completely before removing the tape. Then apply your topcoat. Enjoy!


Wednesday, November 6, 2013

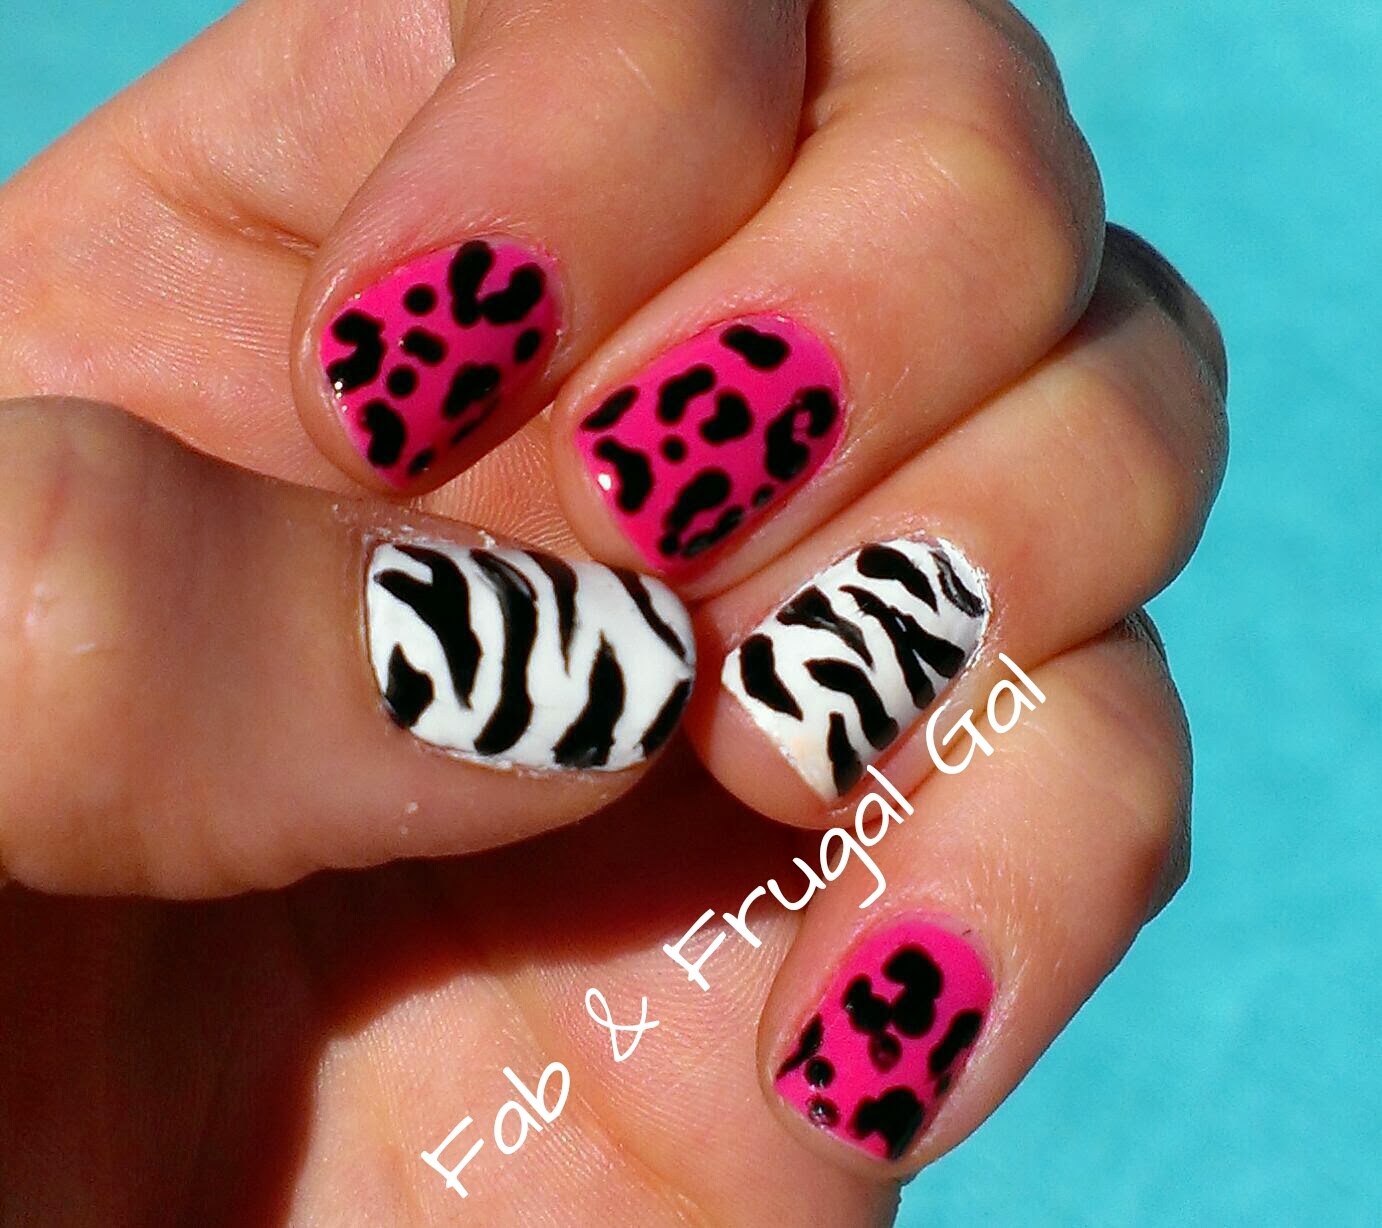
Leopard Zebra Mani


I like this fun bright manicure. I know it's the middle of fall and I should be dusting off all of my dark colors but I decided to brighten things up and go with this one.

I have been playing around with regular nail polish these days. It's easier to take off than the gel and I have so much time on my hands these days due to my knee surgery. Anyway hope you enjoy this easy cute mani.

What you will need:
- Top and base coats
- Pink polish
- White polish
- Black polish
- Dotting tool
- Thin nail brush

Start by prepping your nails like you normally would (file, clip, etc.)

Paint your index, middle, and pinky fingers pink and your thumb and ring finger white. Let dry completely.


On the pink fingers, add a few black dots using your dotting tool.


Then create little "C" shapes around the dots in a random pattern.


On the white fingers, paint thin black strips to make a zebra effect.


Finish with a top coat and enjoy! Have fun trying this with different color combinations.


Tuesday, October 29, 2013

Halloween Glitter Mani Tutorial

This picture is taken with a flash

I wanted to do something a little different for my Halloween Mani this year. I did candy corn last year. I am not sure if I like the outcome of these yet. The orange glitter ended up turning out green after I put the top coat on, but I went ahead and decided to post the tutorial anyway.


What you will need:  
- Base and Top Coat
- Black Polish
- Orange Polish
- Black Glitter
- Orange Glitter
- Brush (to apply the loose glitter)


Start by prepping your nails (clip, file, etc). Then paint your base coat and let dry (if using gel polish cure your base coat).

Now, paint the nails you want black, with the black polish. I did my pinky, middle, and index fingers in the black. Then go back and paint your remaining nails with the orange polish. Let dry (or cure if using gel) Repeat this step if another coat is needed.


Next, we are going to apply the glitter. I did a reverse ombre and added the glitter starting at the tips. Dip your brush into the glitter and carefully apply to the the nail.


Apply the black glitter on the orange nails and the orange glitter on the black coat. Then apply your top coat and let dry (or cure if you are using gel polish). I like to add two top coats when using the loose glitter.

For some reason the orange glitter came out looking green but green is still kind of Halloween. What do you guys think? Ya or Na on this one?

this picture is taken without a flash in natural light

Friday, August 30, 2013

Leopard Tri-Color Mani


This week I decided on a fun multi colored leopard print mani. I used a Pinterest picture as inspiration but the link was dead so I can't give the person credit. I also added my own spin on it to make it a little different.

The leopard spots are extremely easy to do and I love how they turn out. This is a fun mani for those who are just starting out!

What you will need:
- Top and Base coats
- Black polish
- Teal (or light blue) polish
- Light Pink polish
- Dotting tool (or bobby pin but dotting tool works best)
- Foil or something similar (I use the top of a vitamin bottle so I can reuse it)


Start by prepping your nails as you normally would do (cut, file, etc) Next, paint your pinky and index finger with the black polish. Paint your ring and middle finger with the teal polish. Paint your thumb with the pink polish.

Next, we are going to create the spots. Dab some of the pink polish onto your foil. Use the larger end of your dotting tool, dip the ball into the pink polish so that we can create large non-perfect dots onto the ring and middle fingers.


Repeat the same steps for your thumb but instead of using pink, use the teal color. What we are doing is creating an offset effect with the colors.


Now we are going to finish the spots by adding black accents to the nails. Using the smaller end of the dotting tool, create small "C" shapes around the circles. Add a few small random dots in between the pattern. Repeat the steps for the thumb nail and the teal colored nails (ring and middle finger).


Last step is to paint with a top coat and you are all done! Rock that awesome mani :) Try playing with different colors to see what you like best.


Thursday, August 22, 2013

Pink Glam Nail Mani


It's been awhile since I posted! I am so sorry! I have been very busy. But I think you will like this one and I hope this makes up for it.

I am going to post most of the steps for this one but not all of them because it's actually quite easy and like a lot of my other tutorials.

What you will need:
- Base and Top coats
- All over color ( I used IBD Funny Bone - a pink gel color)
- Sliver glitter (or lose glitter)
- Rhinestone gems (I used stars and a square one for my pinky)

Start by prepping your nails first (file, clip etc) then paint all of your nails with your base coat. Next paint all of your nails with your all over color.


Next, on your thumb, use a toothpick or orange stick to apply three star rhinestones in a row. Use clear top coat to get it to stick to your nail.


Then apply a single gem to your pinky. Paint your ring finger with silver glitter. On your pointer finger do an ombre effect and just paint the tip of the nail.

Make sure to put a nice thick top coat on the nails that have the gems. I start by putting a small dot of top coat right on top of the gem then use the brush to even it out. This allows to get a good thick coat so the gems do not fall off.

Be creative and have fun!


Sunday, July 14, 2013

4th of July Nails on July 14th


I'm a slacker! I know it. I did this manicure a few days before the 4th in hopes to post this on the 4th. I failed miserably on that goal BUT I did manage to post it on the four...teenth. Works sorta.

Anyway here's the manicure. I also slaked in the fact that I forgot to take pictures during some of the steps. I know, I suck. I will do my best to explain what I did. Use your imagination. :)

What you will need:
- Top and base coats
- Red, white, and blue nail polish
- Thin nail brush
- Dotting tool
- Glitter (optional)


Step 1: Start by prepping your nails as you normally would (file, clip etc.) Then paint your base coat and let dry. (cure the base coat if you are doing a gel manicure) 

Step 2: Paint ring finger from the cuticle halfway up the nail with red paint in a line. It is sometimes easier to use your thin nail brush and paint a divider line, and use that to help guide you.


Step 3: Paint the remainder of the nail with blue polish.


Step 4: Paint your thumb and pinky fingers with red polish. Paint your middle and index fingers with blue polish. Let dry completely. (If using gel cure hand in the UV light)


Step 5: On the middle finger in the blue part, dot white dots like starts in a even way across the nail.

Step 6: On the middle finger in the red part, carefully paint thing white stripes with your nail brush. Let dry completely (or if using the gel polish cure in UV light)

Step 7: **Optional** if you want to add some more bling, add red glitter over the red nails and blue glitter over the blue nails. I used lose glitter and added it using a dry brush.

Step 8: Top coat and let dry.

Now enjoy your patriotic nails! I got so many compliments on this manicure even though the lines were not that straight. People loved it and so did I. Try mixing it up or adding more flags.