Sunday, November 10, 2013

Marble Nails - My First Attempt


I have had entirely way too much time on my hands lately so I've been pulling out all of the nail polish tricks.

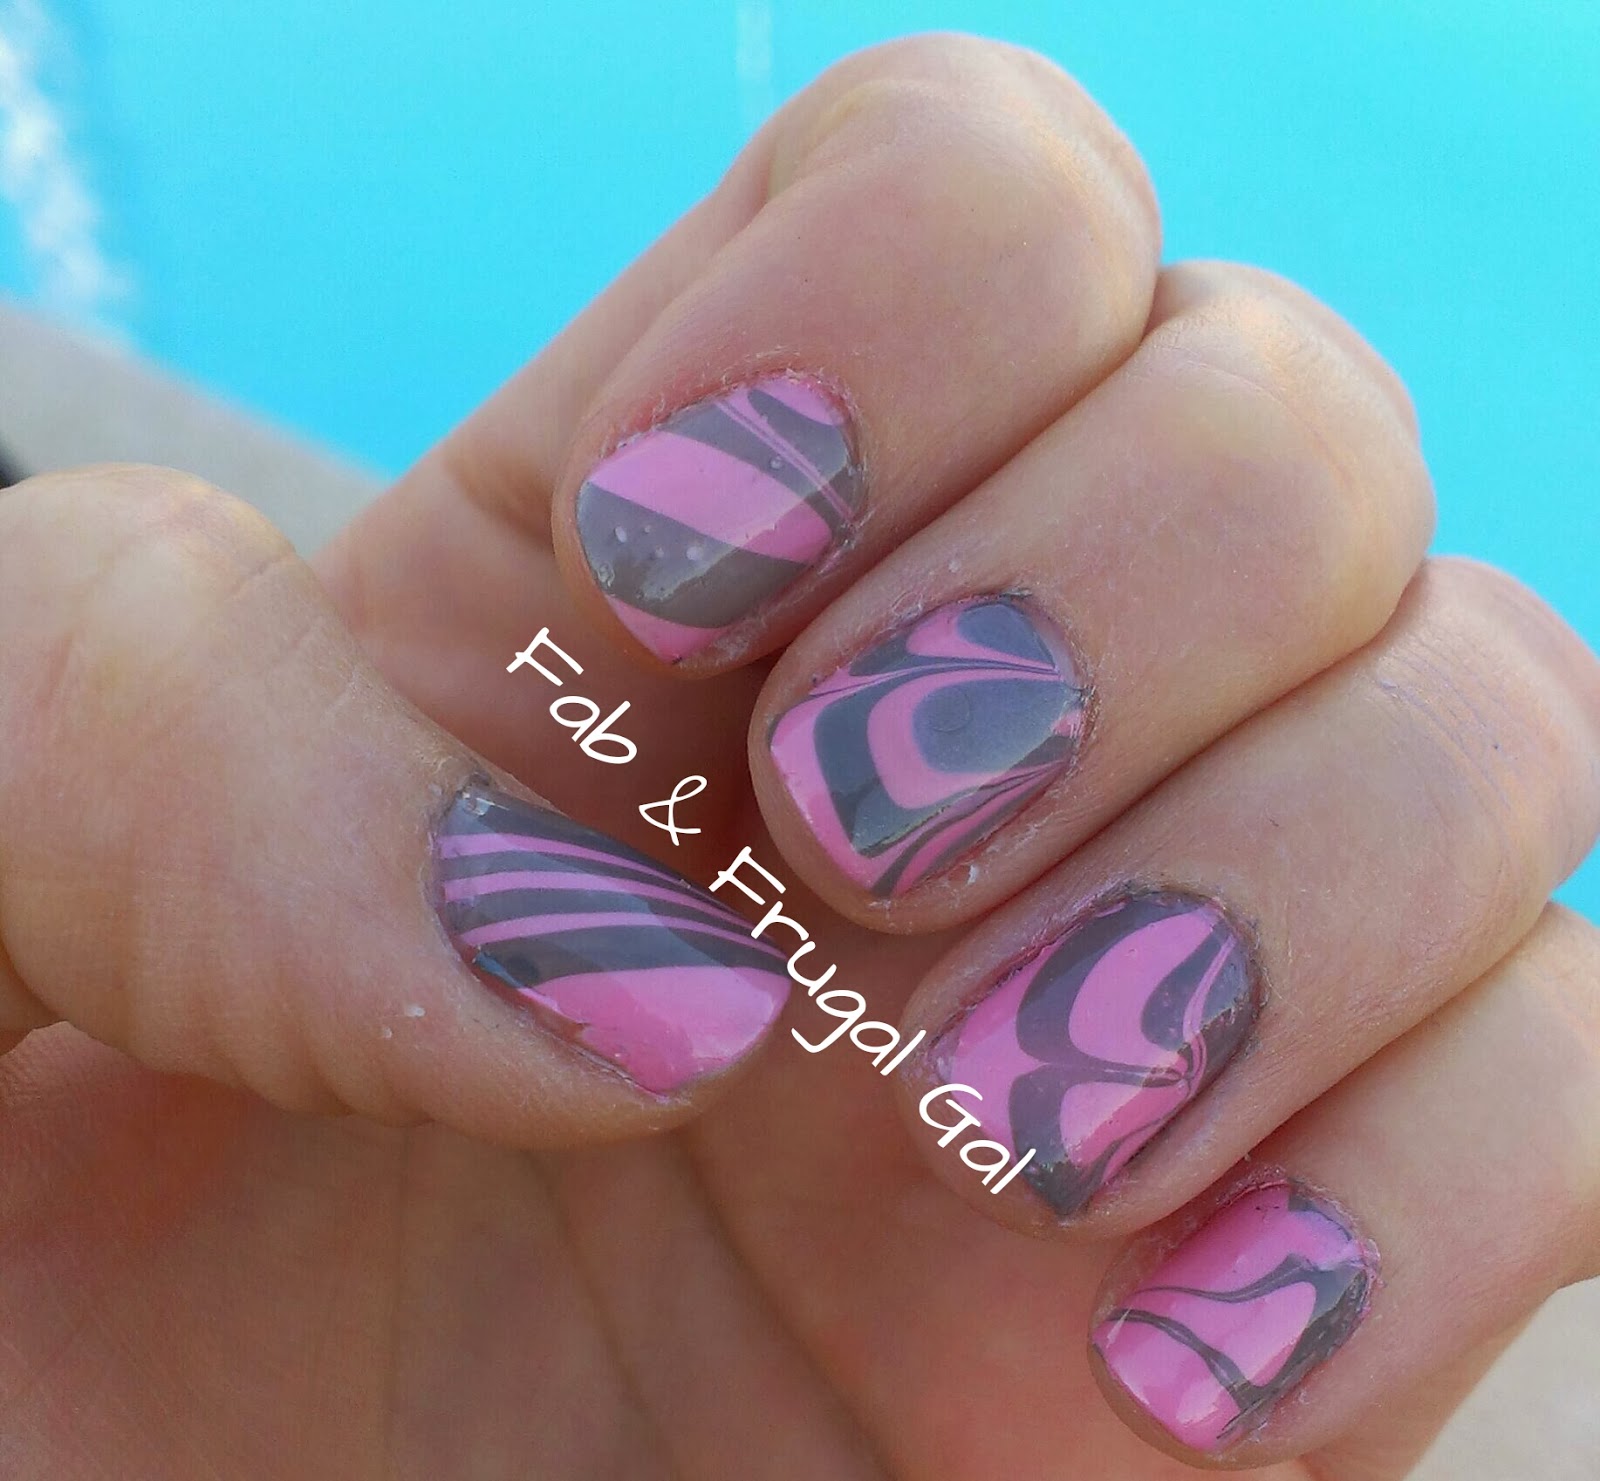
The marble nails are something that I have always wanted to try and went ahead and attempted them a few days ago. I was surprised at how easy this was. It was a bit time consuming but with a bit of patience you can have some awesome water marble nail designs.

What you will need:
- Base and top coats
- Nail colors (as many as you want)
- A cup of water
- Q-tips
- Tape
- Nail polish remover and a brush (to remove excess)
- Toothpick (or small dotting tool end)

The first thing you need to do is prep your nails by filing, clipping, etc. Then go ahead and paint your nails with your base coat and let dry. Next, paint all of your nails an all over color. I used a light nude color. It's best to use a color that will match your marble colors in case there are spots missed. If you use a similar color the mistake won't show through as easy.

Now, before you start your water polish, tape your nails around the cuticle. This is to help reduce the amount of polish you get on your finger when you dip it into the water.


Now with the colors you have picked for the marble, start by adding drop by drop alternating each color into the cup of water. You want the water to be room temperature and you want a nice thin polish that will spread in the water. **hint** if you apply a drop into the water and it does not spread, try using a different polish. Take your Qtip and remove any of the polish that you have added and try adding drops to the water until you find a good polish. Make sure to remove all of the polish and excess drops of the polish you do not want to use before trying another color.


Now take a toothpick and make your design in the water. Be careful not to press too hard you want to use a light touch and swirl around the polish. Move quickly because the polish will start to dry.


Once you find a design in the water that you like dip your nail completely into the water. Take your Qtip and remove the remainder of the polish so there is a clear area when you go to pull your nail out of the water.


Remove the tape and use the nail polish and brush to clean up any excess polish.

Repeat for each nail and ensure the water is clean before you start adding drops of polish into the water. There are so many combinations and ideas that you can do with this. Have fun!


Friday, November 8, 2013

Using a Nail Stamper

Indoor light
I have had my mash nails stamping plates for quite some time and haven't done anything with them. I pulled them out and tried this neat floral type design.

Start by painting your nails an all over color. I chose purple. Let dry completely before stamping.


Now chose your stamping plate and paint your accent color onto the stamp. I used white. Use your scraper to scrape off the excess polish. Then take your stamper and stamp it onto the polish.


Now take the stamper and make sure you have a good solid design on the rubber part. If you do quickly stamp it onto your nail.


Wipe off the stamper and the scraper and the plate with nail polish remover and repeat each step for every finger.

The stamper kit is something you have to practice with but when you get the hang of it you can come up with some really neat designs! 

In sunlight

Wednesday, November 6, 2013

Leopard Zebra Mani


I like this fun bright manicure. I know it's the middle of fall and I should be dusting off all of my dark colors but I decided to brighten things up and go with this one.

I have been playing around with regular nail polish these days. It's easier to take off than the gel and I have so much time on my hands these days due to my knee surgery. Anyway hope you enjoy this easy cute mani.

What you will need:
- Top and base coats
- Pink polish
- White polish
- Black polish
- Dotting tool
- Thin nail brush

Start by prepping your nails like you normally would (file, clip, etc.)

Paint your index, middle, and pinky fingers pink and your thumb and ring finger white. Let dry completely.


On the pink fingers, add a few black dots using your dotting tool.


Then create little "C" shapes around the dots in a random pattern.


On the white fingers, paint thin black strips to make a zebra effect.


Finish with a top coat and enjoy! Have fun trying this with different color combinations.


Monday, November 4, 2013

Black and Pink Mani


Thank you for the lovely Jaycy for being my nail model. She even chose the design.

I didn't get a chance to snap photo's while I was doing this but this is a take off of a regular french tip.

Start by painting a line with the black polish of where you want the tip to be. Then paint below that line. I hand marked the tip but you can use tape to help. Then pain the tip pink.

I really like this look, I just wish I had long nails!


Saturday, November 2, 2013

Fabric Flowers Galore!

I recently posted a No Sew Halloween Hair clip tutorial. I received really good responses from these cute little flowers so I wanted to posted some more ideas.

The below ideas are all made with scrap pieces of fabric and again, I have a blog tutorial posted here on how to make them.

These are headbands I made for some family and friends. They both had little girls that a clip wouldn't work for.


I made this for a 16 year old girl. I made this one with a hair clip and attached it to a card.


Here are some more that I made to be hair clips. I added tulle to one of them when I wrapped the fabric to add an extra pop.


These are so easy to make and there many more things you can do with them. You can attach them to a pin and use them as a broach. You can sew them to purses or attach to a hat or a shirt.

Thanks to my niece Haylee for being my beautiful model :)